


Spray foam insulation is commonly used in buildings to improve energy efficiency and comfort by sealing cracks and gaps. It has excellent thermal and sound insulation qualities, making it an ideal choice for insulating homes. Installing spray foam insulation is relatively simple when using a spray foam insulation kit.
What Is A DIY Spray Foam Insulation Kit?
A DIY spray foam insulation kit contains all the equipment and materials you need to install spray foam insulation successfully. Most kits include foam canisters, a dispensing gun, hoses, applicator nozzles, protective gear, and detailed instructions. Spray foam insulation kits are great for do-it-yourself projects. They’re easy to use and provide an effective way to insulate your home or business.
Here’s a step-by-step guide on using a spray foam insulation kit:
Step 1: Wear Protective Gear
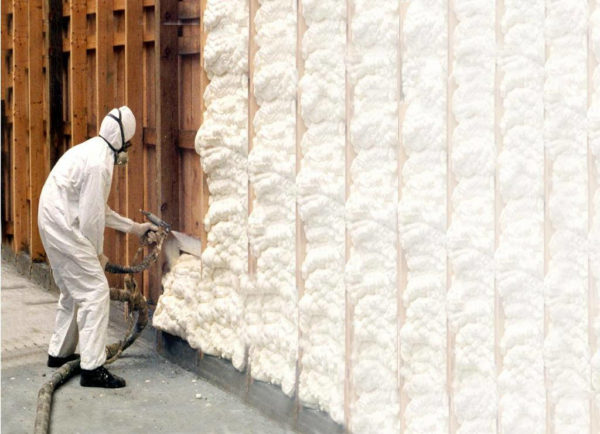
Before beginning your spray foam installation project, it’s important to wear protective gear for safety purposes. It includes goggles, gloves, and a face mask or respirator. This will prevent any of the chemicals in the material from entering your body through your eyes, mouth, or skin.
Step 2: Make A Plan For Spraying
Once you have all your safety gear on, it’s time to plan to spray the insulation. You’ll need to know how much foam you need and where you’ll spray it. Measure the area that needs to be insulated, and then refer to the instructions provided with your kit to determine how much foam should be used in each area.
Step 3: Prepare The Surface
Your surface must be clean, dry, and free of debris before applying the spray foam insulation. Use a vacuum cleaner to remove as much debris as possible. Never spray foam on wet surfaces, or else the foam won’t adhere properly to the surface.
Before you start, confirm that all electric boxes or other connections are wrapped and tied up in plastic bags. If they aren’t properly sealed, foam can expand and enter sensitive areas. Fixtures such as wiring and pipes can be sprayed over, but anything you might need to work on later shouldn’t be covered. If you were to cut into the foam at a later date, it would ruin the seal and reduce its viability.
Step 4: Set Up Your Spray Foam Equipment
Take a few minutes to read the instructions in your spray foam insulation kit. This will ensure you understand how the equipment should be used and the proper safety precautions to take during installation. Follow the instructions included with your kit to assemble and set up all of the necessary equipment. Make sure you have all the tools, hoses, and nozzles needed before beginning your spray foam installation project.
Step 5: Prepare Your Foam Canister
Once you’ve determined how much foam is needed, it’s time to prepare your foam canister. Make sure the valve is turned off before attaching the hose and nozzle, then turn on the valve slowly until you hear a hissing sound indicating that air is entering the canister.
Also, test your nozzle to ensure that it’s working properly. If you don’t hear a hissing sound and the foam isn’t coming out evenly, try adjusting the nozzle or replacing it with another one from your kit. You must replace your nozzle if you stop spraying for more than thirty seconds to avoid kit damage and accidents.
Step 6: Test A Small Patch First
Before you begin spraying your entire area, test a small patch of foam on an inconspicuous part of the surface. This will ensure that the foam is being applied correctly and that there are no problems with the equipment or material before spraying.
If everything looks good, it’s time to start spraying!
Step 7: Begin Spraying
Once everything is set up correctly, turn on your spray foam canister and begin spraying in an even motion. Start at one corner of the area and work your way across in long sweeping motions. Be sure to cover all of the cracks and gaps that need insulation by applying an even coating of foam throughout the area. Make sure to keep the nozzle at least six inches from the surface and try not to overlap the foam already applied.
Once you’ve finished spraying, turn off the canister and allow the foam to dry for 24 hours before restoring power or working in the area.
It’s important to note that once the foam has been sprayed, it is difficult (if not impossible) to remove it without damaging your walls or ceiling. Be careful when applying it, and follow these steps carefully.
Step 8: Clean Up & Finish
When you’re finished spraying, clean up any excess material from the area. Wipe down surfaces with a damp cloth and dispose of unused foam canisters according to local regulations. Foam can easily be removed while wet using warm soapy water, but it may require more scrubbing if it has already dried.
Step 9: Disposal
Dispose of your tanks based on the federal, state, and local government regulations where you live. If you don’t know what those are, your local waste disposal service can help. Also, never burn tanks.
Spray foam insulation is a great choice for anyone looking to reduce their energy bills while protecting their home from drafts and outside temperatures. If you’ve followed these steps correctly, your newly insulated walls will be able to keep your home warm and energy efficient for many years to come.
And as always, hire a professional if you feel uncomfortable or unsure about any part of this process. Professional installers will have the proper tools and knowledge to apply your insulation correctly and safely.
If you’re looking for a reliable spray foam insulation company in the GTA – Look no further than Spray City Insulation. Spray City Insulation provides top-quality insulation solutions for residential and commercial properties, helping clients save energy and money. Read more about the company and its services at spraycityinsulation.ca.